Map overview

|
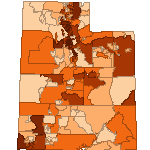 |
Display of position
The map overview indicates the position and size of the actual map window
relative to the regional overview with a red frame. When viewing a very small
map section (large-scale maps) the red frame will be replaced by crosshairs
 . .
The map window can be repositioned by clicking on any place in the map
overview. The click point will then be the center of the new map. This will not
change the map size.
|
Toolbar

Some tools trigger an action or open a dialogue for further
entries, immediately.
Other tools control the function of a mouse click in the map window. The
currently active mode can be recognised by a different color of the corresponding
icon. A selected mode stays active until another mode tool will be selected.
|
|
|
Refresh map
The actual map section will be refreshed. Especially after changing the
visibility of layers this is useful.
|
|
|
Initial view
The currently selected map will be reloaded with
its initial state. For this purpose the map window will be positioned to the
section which was initially loaded. The visibility of layers
and the marking for data queries will be reset
to the predefined values. Layers which were loaded by the dialogue
add WMS to layerlist will be deleted from the layerlist.
|
|
|
Previous view
Access the current map view with the previous bounding box from the history
|
|
|
Next view
Access the current map view with the next bounding box from the history
|
|
|
Zoom in
In this mode a click on any place inside the map window will center the map to that
position and increase the map scale by 25% (e.g. from 1:5000 to 1:3750).
Alternatively with pressed left mouse button you can drag a rectangle within the map
window, which will then be displayed completely in the map window.
|
|
|
Zoom out
In this mode a click on any place inside the map window will center the map to that
position and reduce the map scale by 25% (e.g. from 1:500 to 1:750).
|
|
|
Zoom to layer
This tool zooms in to the standard bounding box of the selected layer.
|
|
|
Request feature info
In this mode a click onto the map inside the map window will trigger a feature
info request. The result will be displayed in a new window.
|
|
|
Recenter
The map section will be centered to the position which was clicked on in the map
window.
|
|
|
Move map
In this mode you can click on the map at any place and it can be moved with pressed left
mouse button. By releasing the mouse button the movement will be terminated and the missing
parts of the map will be loaded automatically. The map scale will not be influenced by
this action.
|
|
|
Add WMS
This tool opens a dialogue which provides the opportunity to load further
maps from WMSs in the internet. Layers from these internet servers which are
selected by the user will then be added to the layerlist.
|
|
|
Print map
A mouse click on this button opens a window, where a pdf document of the current
map view can be generated. Additionally you can specify a title, a description
and the author of the map by using the three text fields.
There are two templates for the document; One with horizontal and one with vertical
alignment.
|
Menubar

|
|
|
Save context
With a click on this button you can save the current processing state of a map.
This not only includes the current bounding box, but also the visible layers and their order.
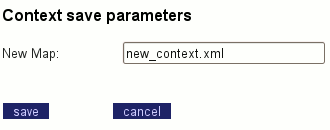
The name of the context you want to save can be specified in a text field.
If a context with this name already exists the existing one will be overwritten.
|
|
|
Load context
Contexts that were saved or provided by the administrator, can be loaded by a mouse click
on this button. Initially a dialogue will be opened where all available contexts are listed
in a drop down list.
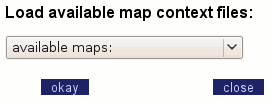
After selecting a context and clicking on the save button it will be loaded into the
portal.
|
|
|
Help
A mouse click on this button opens this help page.
|
|
|
Login
To restrict access to certain tasks or views to registered users, it is possible
to provide a user with a sessionID. This sessionID is granted on login by entering
a valid user name and password. After login, this sessionId will be attached to each
request and verified. To have this functionality enabled in the portal, the
administrator needs to configure deegree.security components.
|
|
|
Logout
When a user is logged in, this button will enable logout and kill the user's session.
|
Scale

|

|
Scale levels
a drop-down list enables to select between different predefined map scales.
|
Theme selection

|
|
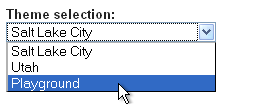
Theme selection
The drop down list enables you to choose a different map context.
|
Switch between legend and layer list

|

|
drop-down list
With this control you can switch between the view of the
layerlist and the legend. The
related element (layerlist or legend) is shown below the toggle switch.
|
Layerlist

|
|
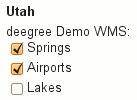
Visibility of layers
The visibility of layers will be controlled by the check box in front of the layer's
name. Only the checked (="visible") layers will be requested from the corresponding
Web Map Service and incorporated into the map image.
Changes in this setting will not force a new map request automatically, this has
to be triggered by clicking the refresh button.
Layers highlighted in grey can not be displayed in the preset map section. For
layers added to the map by the dialogue Add WMS, this
function is not available.
|

|
Allocation of data queries
These radio buttons (  / /  ) control which layer is
requested for feature info request. The feature info
request can refer to only one layer, so the selection of a new layer will
reset a previously made selection ) control which layer is
requested for feature info request. The feature info
request can refer to only one layer, so the selection of a new layer will
reset a previously made selection
Layers that are not queriable for feature info are not provided with a radio button.
If a layer which is set to "not visible" at visibility
of layers (  )
is selected for feature info, it will also be set to visible ( )
is selected for feature info, it will also be set to visible (  ). ).
|

|
Re-sort layerlist
When the map image is built the single layers will be displayed in the same order as
they are displayed in the layerlist. Therefore the topmost layer of the layerlist will be drawn
on top of all the other layers in the map window and so it possibly covers subjacent layers. The
user can move single layers within the layerlist and sort the list to his individual
convenience to avoid undesired overlay effects.
The single layer to be moved has to be selected by clicking on its name.
The related line will be highlighted in yellow (see fig. left).
By clicking on the controls  or or
 at the bottom of the layerlist
the selected layer will be moved one line up or down.
Resorting the layerlist will not automatically force a new map request, this has
to be triggered by the user by clicking on the tool refresh.
Single layers can only be moved within their own layergroup. at the bottom of the layerlist
the selected layer will be moved one line up or down.
Resorting the layerlist will not automatically force a new map request, this has
to be triggered by the user by clicking on the tool refresh.
Single layers can only be moved within their own layergroup.
|
|
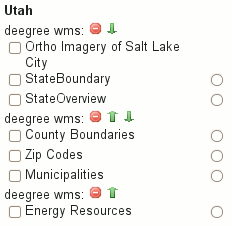
Remove and resort layergroups
For each additional map offer the user added through the dialogue
Add WMS, a new layergroup will be added to the layerlist. The
the same WMS can be added several times (e.g. with different layers). In this case several
layergroups will be displayed with the same name.
If there are multiple layergroups in the layerlist, additional buttons appear next to
their names: The button "remove layergroup  will remove the whole group from the layerlist.
This will cause an automatic rebuild of the map without the layers of the removed WMS. will remove the whole group from the layerlist.
This will cause an automatic rebuild of the map without the layers of the removed WMS.
The buttons "move layergroup up"  or "move layergroup down" or "move layergroup down"
 a particular
layergroup can be moved up or down within the layerlist. Unwanted overlay effects
between different groups can be prevented by this. Buttons are only displayed for
those directions to which a movement is possible. After moving a layergroup up or
down, a new map with the changed display order will be created automatically. a particular
layergroup can be moved up or down within the layerlist. Unwanted overlay effects
between different groups can be prevented by this. Buttons are only displayed for
those directions to which a movement is possible. After moving a layergroup up or
down, a new map with the changed display order will be created automatically.
|
Legend

|
|
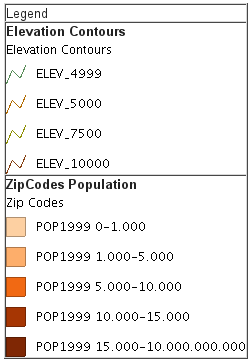
Legend graphics
In the legend area a legend graphic will be displayed for basically each visible
layer (visibility of layers), which explains the cartographic
presentation of the respective layer. An exemplary legend graphic is shown to the left.
|

|
Place holder
Additional map offers which the user added with the dialogue add
WMS sometimes do not offer a legend to be displayed. Reason: the legend graphic
request for a WMS is standardized, but the actual delivery of a legend graphic is
not mandatory. Thus many WMS do not support the request of legends at the moment.
In those cases a placeholder graphic will be displayed together with the title
(title)of the map layer(layer), as shown in the adjoining example.
|
Coordinate display

|

|
The coordinates matching the current mouse position are displayed.
|
Timeselect

|
|
|
Time select
The Timeselect modul offers to request and display time-dependant data.
The icon opens a new window, where time parameters may be specified for the map request.
|
|
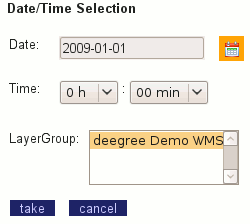
Time select parameter form
The form takes a date and a time value, which will be added to the GetMap request
as time-parameter. Further, the form allows to select layergroups from a drop down
list for which this time parameter shall be evaluated.
The date may either be entered directly with the keyboard (YYYY-MM-DD), or by
clicking the calandar symbol. The time (hours and minutes) may be selected from the
drop down lists.
|
Metadata search

This module offers metadata search via CSW services.
|
|
Simple & Advanced Search
After starting the module (opens in a new window), you may choose between
simple and detailed (advanced) search.
Simple searches only take a single search string. Detailed searches offer to
restrict the search by topic, date and time or area.
|
|
Layer Based Search
You find this icon at the bottom of the layerlist. When a layer gets selected by
clicking on the layer name, this icon may change from inactive (greyish) to active
(blueish), depending on whether metadata info is availible for this specific layer.
clicking on the (active) icon will open a new window containing the metadata.
|
Gazetteer

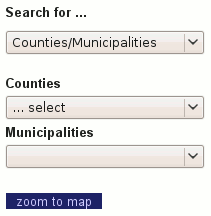
The gazetteer module provides a simple opportunity to search for terms with
spatial reference and to reposition the map window to the related map section.
Drop down lists and input fields are offered for that purpose, which change depending on
the selected gazetteer search.
|
|
Drop down list "Search for.."
Select a catalogue with spatial terms for which to search for.
The behaviour of the other controls depends on the selected catalogue.
|
Digitizing

deegree iGeoPortal provides a module to digitize and transfer
own data using WFS transaction.
To use the digitizer module, a WFS and a WMS need to be configured for the digitized
features. Some adjustments in the digitizer module itself need to be made as well.
Please have a look at the documentation for further details.
|



 will remove the whole group from the layerlist.
This will cause an automatic rebuild of the map without the layers of the removed WMS.
 or "move layergroup down"
 a particular
layergroup can be moved up or down within the layerlist. Unwanted overlay effects
between different groups can be prevented by this. Buttons are only displayed for
those directions to which a movement is possible. After moving a layergroup up or
down, a new map with the changed display order will be created automatically.


